
Sauces & Condiments
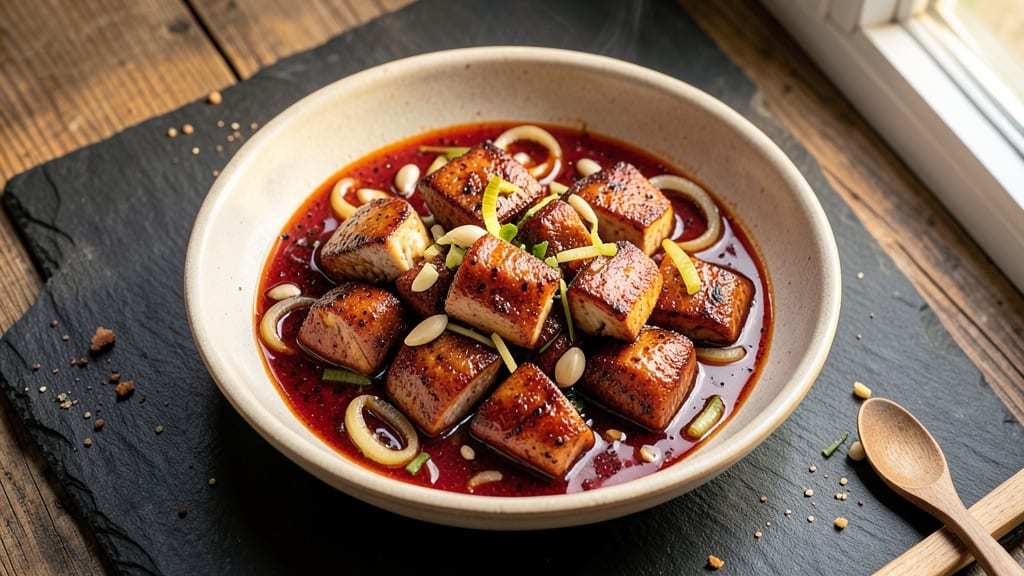
This one-pot chicken chop sauce delivers restaurant-quality stir-fry magic in under 30 minutes—no takeout required. The secret lies in a bold, umami-packed sauce that transforms simple chicken into tender, flavorful bites with just a few pantry staples.
I developed this recipe after craving the perfect balance of sweet, tangy, and savory notes that cut through the richness of the chicken.
The technique is straightforward: sear the chicken first for maximum flavor, then deglaze the pan with a quick sauce made from soy sauce, oyster sauce, and a touch of honey.
The sauce reduces while the chicken finishes cooking, creating a glossy, sticky coating that clings perfectly. This method ensures every bite is packed with depth without requiring advanced skills.
What you'll end up with is a dish that's restaurant-quality but made entirely at home—tender chicken pieces coated in a glossy, caramelized sauce over steamed rice.
The sauce's complexity comes from a simple blend of ingredients that work together to create layers of flavor: the saltiness of soy, the umami of oyster sauce, and the subtle sweetness of honey.
Serve it over steamed jasmine rice or noodles for the full experience, or pair it with roasted vegetables for a lighter twist. The leftovers reheat beautifully, making this a perfect weeknight solution that feels like a special occasion meal. Let's get cooking!
Ingredients for chicken chop sauce
Pantry staples meet umami magic for this restaurant-style one-pot chicken chop sauce.
| Ingredient | Amount | Notes |
|---|---|---|
| Boneless Chicken Thighs 🍗 | 1 ½ lb | Cut into 1-inch pieces |
| Vegetable Oil 🫒 | 2 tbsp | For high-heat searing |
| Yellow Onion 🧅 | 1 whole | Thinly sliced, about 1 cup |
| Garlic Cloves 🧄 | 4 cloves | Minced, for sauce depth |
| Fresh Ginger 🌿 | 1 tbsp | Finely grated, for zing |
| Soy Sauce 🍶 | ½ cup | High-quality, light or dark |
| Oyster Sauce 🍲 | 2 tbsp | For umami richness |
| Honey 🍯 | 1 tbsp | For subtle sweetness |
| Rice Vinegar 🍶 | 1 tbsp | For tangy balance |
| Sesame Oil 🌰 | 1 tsp | Toasted, for aroma |
| Cornstarch 🌾 | 1 tbsp | For sauce thickening |
| Green Onions 🧅 | 2 whole | Sliced, for garnish |
| Salt 🧂 | ½ tsp | Kosher or sea salt |
| Black Pepper 🌶️ | ¼ tsp | Freshly ground |
The chicken thighs are the star—boneless, skinless cuts ensure even cooking and maximum flavor absorption. Trader Joe's or Costco often have pre-cut thighs at better prices than whole cuts. Look for pieces with good marbling for extra juiciness. If using chicken breast, pound it to an even thickness to prevent dry spots. The thighs can be prepped ahead: trim excess fat, pat dry, and store in the fridge for up to 2 days or freeze for 3 months—just thaw completely before cooking.
No oyster sauce? Substitute with 1 tbsp soy sauce plus 1 tsp fish sauce for umami depth (though traditionalists may notice a difference). The honey can be swapped for maple syrup or agave if you prefer a less floral sweetness. For extra heat, add 1/2 tsp red pepper flakes or a dash of Sriracha. The cornstarch is crucial for thickening—Bob's Red Mill brand works best, but any food-grade cornstarch will do. If you're short on time, 1 tbsp arrowroot powder works too. Fresh ginger loses potency quickly, so buy it pre-grated at the store or freeze whole chunks for up to 6 months—just grate what you need.
This sauce tastes even better the next day as flavors meld. Store leftovers in an airtight container in the fridge for up to 4 days or freeze for 3 months. Reheat gently in a skillet or microwave, adding a splash of water if the sauce thickens too much. For quick meals, double the recipe and freeze half—portion into single servings for easy grab-and-go dinners. The sauce also freezes beautifully on its own, perfect for future stir-fries or marinades.
Why You'll Love This Recipe
- One-Pan Magic: I swear by this recipe when I’m too tired to wash dishes. Toss the chicken thighs, sliced onions, and minced garlic into one skillet—no extra pots, no fuss. The ginger caramelizes right there, turning the oil golden and fragrant while you stir.
- Umami Bomb: That first bite of crispy chicken with the sauce clinging? The garlic and ginger build layers—sweet, spicy, and deeply savory. I’ll be real: the sauce is so good I drizzle it over rice just to taste it again.
- Weeknight Workhorse: It’s my go-to when friends drop by unannounced or I need to feed the family fast. Double the batch, and you’ve got lunch tomorrow or a freezer meal ready. Honestly, I’ve served it at BBQs, potlucks, and even my kid’s soccer practice—no one ever questions it.
- Budget-Friendly Crisp: Chicken thighs are forgiving and cheap, and this recipe turns them into something special. The oil renders perfectly, giving the skin that addictive crunch without deep-frying. Leftovers? Even better cold the next day—packed with lunchboxes or reheated for a lazy morning.
Step-by-step instructions for chicken chop sauce
Master this one-pot stir-fry technique for restaurant-quality umami depth every time.
Prepare the Chicken and Aromatics
Cut the 1.5 lb boneless chicken thighs into 1-inch pieces and pat them dry with paper towels. This helps the chicken sear properly instead of steaming. In a small bowl, combine the 0.5 tsp salt and 0.25 tsp black pepper, then season the chicken evenly on all sides.
Finely mince the 4 cloves garlic cloves and grate the 1 tbsp fresh ginger using a microplane or fine grater. Thinly slice the 1 whole yellow onion into half-moons—about 1 cup when sliced. Keep these aromatics separate until you're ready to cook them. The garlic and ginger will form the flavor base of your sauce, while the onion adds sweetness and texture.
Sear the Chicken in High Heat
Heat a large skillet or wok over medium-high heat until it's smoking hot. Add the 2 tbsp vegetable oil and swirl to coat the pan evenly. Working in batches if needed, add the seasoned chicken pieces and let them sear undisturbed for 3-4 minutes until they develop a deep golden-brown crust on all sides.
Don't overcrowd the pan—this prevents the chicken from cooking evenly. Once the first batch is browned, transfer it to a plate and repeat with the remaining chicken. The high heat is key here; it creates that signature caramelized flavor that forms the foundation of the dish. If the oil starts smoking excessively, reduce the heat slightly but keep it hot.
Build the Sauce Base
With the chicken still in the skillet, reduce the heat to medium and add the sliced yellow onion. Cook for 3-4 minutes until the onions soften and begin to caramelize slightly. Add the minced garlic cloves and grated ginger, stirring constantly for 30 seconds until fragrant—this releases their full flavor potential.
Pour in the 0.5 cup soy sauce and 2 tbsp oyster sauce, scraping up any browned bits from the bottom of the pan. These bits, known as fond, are packed with flavor. Add the 1 tbsp honey and 1 tbsp rice vinegar, then stir to combine. The vinegar adds a bright tang that balances the richness of the sauces. Let the mixture simmer for 2 minutes to allow the flavors to meld together.
Thicken and Finish the Sauce
In a small bowl, whisk together the 1 tbsp cornstarch with 2 tablespoons of water to create a smooth slurry. This will help thicken the sauce to the perfect consistency. Pour the slurry into the skillet and stir constantly for 1-2 minutes until the sauce thickens and coats the back of a spoon.
Return the seared chicken to the skillet and toss everything together, letting the chicken absorb the rich, glossy sauce. Cook for an additional 2 minutes until the chicken is fully heated through and the sauce has thickened to a glossy sheen. Stir in the 1 tsp sesame oil and taste to adjust seasoning—add a splash more soy sauce if needed for saltiness or a bit of rice vinegar for tang.
Garnish and Serve Immediately
Slice the 2 whole green onions into ¼-inch pieces and sprinkle them over the finished dish. The green onions add a fresh, bright contrast to the deep umami flavors of the sauce. Serve the chicken chop sauce immediately over steamed rice or noodles—this dish is best enjoyed fresh while the sauce is still glossy and the chicken is tender.
Each bite should deliver a perfect balance of savory, sweet, and tangy flavors with a silky, well-thickened sauce. The one-pot technique keeps everything simple while delivering restaurant-quality results. Don't let the sauce sit too long after cooking, or it may thicken further and lose its vibrant sheen.
Pro Tips For Making Chicken Chop Sauce
- Sear the Chicken First: Hit the chicken thighs with a quick sear in hot oil—3 minutes per side—before adding anything else. This locks in flavor and keeps them juicy while you build the sauce. I used to skip this and ended up with bland, rubbery chicken that soaked up too much liquid.
- Mince Ginger Fine: Use a microplane or knife to get ginger into a paste, not just tiny chunks. It blends smoother into the sauce and dissolves faster, so you don’t taste raw bits. I learned this the hard way after biting into a surprise ginger surprise mid-bite.
- Sweat Onions Low: Cook onions over medium-low heat until they’re translucent but not brown—about 8-10 minutes. Rushing this step turns them bitter and burns the garlic before it even hits the pan. Patience here means flavor that actually sings.
- Deglaze with Soy Early: As soon as you pull the chicken out, splash in 2 tablespoons of soy sauce while the pan’s still hot. This scrapes up all the browned bits (fond) that’ll thicken your sauce later. I now keep a small bowl of soy handy just for this—no more watery, flavorless sauces.
Serving suggestions for chicken chop sauce
Rice Pairings
Steamed jasmine rice is my go-to base for this dish—its delicate floral aroma complements the sauce's bold flavors beautifully. Use a 1:2 rice-to-water ratio and cook until just tender for the perfect texture.
For extra richness, try butter-basted rice by stirring in 1 tbsp butter and ½ tsp salt during the last minute of cooking. 🍚
For a heartier option, serve over brown rice or forbidden black rice to add nutty depth and visual contrast. I also love using leftover rice from previous meals—it absorbs the sauce even better, creating a cohesive texture.
If you're short on time, microwaveable rice works in a pinch, though fresh-cooked rice always tastes best.
Noodle Alternatives
Egg noodles or udon noodles add a satisfying chew that pairs wonderfully with the sauce. Cook them 1 minute less than package instructions since they'll finish cooking in the skillet. For a lighter option, try rice noodles or soba noodles—their subtle flavors let the sauce shine without competition. 🍜
For a fusion twist, serve over lo mein noodles or chow mein noodles for a more traditional Chinese takeout vibe. I recommend King Noodle brand for their perfect texture and durability during stir-frying.
If you're feeling adventurous, glass noodles (cellophane noodles) add a unique, slightly chewy texture that soaks up the sauce beautifully.
Vegetable Sides
Steamed bok choy or baby bok choy adds a fresh, slightly bitter contrast that cuts through the richness.
Blanch for 2 minutes before serving to maintain crispness. Stir-fried broccoli or snow peas work equally well—just cook them separately in the same pan after removing the chicken to preserve their vibrant color. 🥦
For a crunchy element, serve with quick-pickled cucumbers (slice ½ cucumber thin, toss with 1 tbsp rice vinegar, ½ tsp sugar, and ¼ tsp salt) or mandarin orange segments for a sweet-tangy pop.
These additions brighten the plate and keep every bite exciting. If you prefer heartier veggies, roasted sweet potato cubes add natural sweetness that pairs perfectly with the sauce.
Protein Swaps
This recipe works equally well with pork tenderloin or shrimp—just reduce cooking time to 2-3 minutes for shrimp to avoid overcooking. For a vegetarian version, swap the chicken for extra-firm tofu (press and cube first) or mushrooms (shiitake or oyster work best). 🍄
If you're using chicken breast, pound it to ¼-inch thickness and marinate in 1 tbsp soy sauce for 15 minutes before cooking to prevent dryness. For a seafood twist, scallops or calamari rings add luxurious texture—just sear them separately for 1-2 minutes per side before adding to the sauce.
The key is keeping proteins tender while letting the sauce shine.
Garnish Ideas
Fresh cilantro or Thai basil adds a bright, herbal note that elevates the dish. Toast 1 tsp sesame seeds in a dry pan for 30 seconds until golden, then sprinkle over the top for extra crunch. A drizzle of chili oil (store-bought or homemade) adds heat and visual drama. 🌶️
For a smoky finish, top with crumbled bacon or fried shallots. A few drops of truffle oil (about ½ tsp) lend an unexpected gourmet touch.
If you're serving this for a crowd, set out small bowls of extra sauce, green onions, and sesame seeds so everyone can customize their plate. The presentation makes all the difference when serving restaurant-quality food at home!
Nutrition facts
Frequently asked questions
Can I use chicken breast instead of thighs for this recipe?
Yes, but you'll need to adjust the cooking method to prevent dryness. Pound the chicken breast to ¼-inch thickness and marinate in 1 tbsp soy sauce for 15 minutes before cooking. Use medium heat instead of high to avoid overcooking. Chicken thighs stay juicier because of their higher fat content.
What's the best way to thicken the sauce if it's too thin?
Mix 1 tsp cornstarch with 1 tbsp water to make a slurry, then stir it into the simmering sauce. Cook for another 1-2 minutes until thickened. For extra insurance, add the slurry gradually while stirring constantly. If you don't have cornstarch, a paste of 1 tsp flour with 1 tbsp water works too.
How do I make this recipe with an air fryer?
Cook the chicken in the air fryer first at 375°F for 12-14 minutes, shaking the basket halfway. Then transfer to a skillet to make the sauce as directed. The air fryer gives great browning, but the sauce needs a hot pan to develop its glossy texture. For extra crispiness, spray the chicken with oil before air frying.
Can I prepare the sauce ahead of time?
Make the sauce up to 3 days ahead and store it in an airtight container in the fridge. Reheat gently in a saucepan with 1 tbsp water to loosen it up. For the chicken, cook it fresh or marinate raw pieces in the sauce for 30 minutes before cooking. The flavors meld beautifully overnight, making this a great make-ahead meal.
What's the secret to getting that glossy, restaurant-style sauce?
The key is high heat and constant stirring at the end. After adding the cornstarch slurry, keep the pan on medium-high heat and stir vigorously for 1-2 minutes until the sauce becomes glossy and coats the back of a spoon. A splash of sesame oil at the end adds shine and aroma. Don't walk away—constant attention is crucial!