
Sauces & Condiments
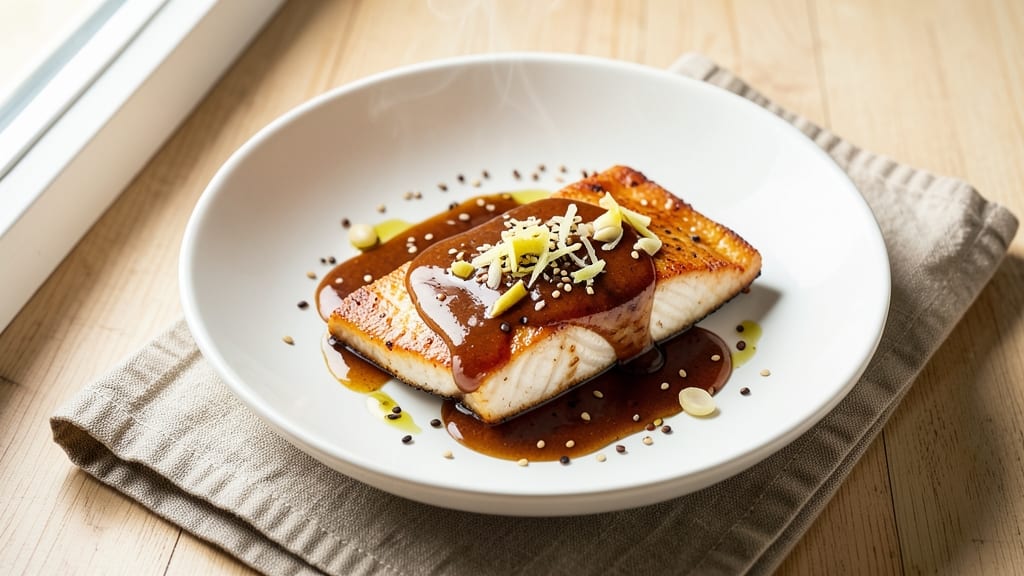
This baked cod with soy sauce recipe transforms simple white fish into a restaurant-worthy dish with glossy, umami-rich skin in just 25 minutes. The secret lies in a marinade of soy sauce, honey, and garlic that creates a caramelized crust while keeping the flesh tender.
I’ve perfected this technique to balance sweet, salty, and savory notes—no complicated steps, just foolproof results.
The process starts with a quick pan-sear to lock in juices, followed by a high-heat bake that delivers that coveted crispy exterior. Soy sauce isn’t just a seasoning here—it’s the star, delivering deep umami flavor while the honey adds just enough sweetness to caramelize beautifully.
This method works for beginners and seasoned cooks alike, guaranteeing a dish that’s elegant yet effortless.
By the time it emerges from the oven, your cod will be golden, crisp, and irresistibly aromatic, with a glaze that clings to every flake. The soy-honey marinade infuses the fish with complex flavor, making it a standout main course.
Serve it with steamed greens or a simple rice pilaf to let the fish shine—this is the kind of dish that turns a weeknight dinner into something special.
What makes this recipe truly versatile is its adaptability. Swap the honey for maple syrup for a different depth of flavor, or add a splash of rice vinegar for brightness.
The technique scales perfectly for one or four servings, ensuring you’ll always have a foolproof, flavor-packed meal ready in under 30 minutes. Let’s get cooking!
Ingredients for baked cod with soy sauce
Four cod fillets, a soy-honey marinade, and a crispy finish—this transforms simple fish into restaurant-quality perfection.
| Ingredient | Amount | Notes |
|---|---|---|
| Cod Fillets 🐟 | 4 whole | Skin-on, 6-8 oz each, center-cut |
| Light Soy Sauce 🍶 | ¼ cup | Kikkoman preferred, low sodium option |
| Honey 🍯 | 2 tbsp | Wildflower or clover variety |
| Garlic Cloves 🧄 | 4 cloves | Minced, fresh preferred |
| Sesame Oil 🫒 | 1 tbsp | Toasted, for aroma |
| Ginger Root 🌿 | 1 tbsp | Freshly grated, finely minced |
| Extra-Virgin Olive Oil 🫒 | 1 tbsp | For pan-searing |
| All-Purpose Flour 🌾 | 2 tbsp | For dredging, fine-milled |
| Salt 🧂 | 1 tsp | Diamond Crystal kosher |
| Black Pepper 🌶️ | ½ tsp | Freshly cracked |
| Lemon Juice 🍋 | 1 tbsp | Freshly squeezed |
| Green Onions 🧅 | 2 whole | Thinly sliced, for garnish |
| Toasted Sesame Seeds 🌾 | 1 tsp | For finishing |
The cod fillets are the foundation—center-cut, skin-on pieces hold their shape best during the high-heat bake. Whole Foods Market and Sprouts Farmers Market consistently carry the freshest, most flavorful cod, often labeled as 'Pacific cod' or 'Alaskan cod'. Look for fillets with vibrant color and minimal fishy odor—these are your quality indicators. If you can't find center-cut, trim the edges to create even pieces. The skin should be intact; if it's peeling, the fish may be past its prime. For best results, use fillets within 2 days of purchase, storing them in the coldest part of your fridge.
No light soy sauce? Dark soy sauce at half the amount works in a pinch, though it'll be slightly darker. Substituting honey? Maple syrup or agave nectar maintains the caramelization, but the flavor profile shifts subtly. Fresh ginger and garlic are non-negotiable for authentic umami—dried ginger at one-third the amount lacks complexity. The sesame oil adds depth but can be omitted if you're sensitive to its strong flavor. For the dredge, cornstarch creates an even crispier crust than flour. If your cod fillets are thin, use 1 tbsp flour per fillet instead of the total amount. The lemon juice brightens the dish; if you're using bottled, opt for fresh-squeezed for superior acidity.
Prep the marinade ingredients first—they'll sit while you sear the cod. The fillets should rest 10-15 minutes after baking before serving to allow the glaze to set. This dish reheats beautifully—3-5 minutes at 350°F restores the crispiness. Store leftovers in an airtight container for up to 2 days, though the flavor peaks immediately. For meal prep, bake an extra fillet—it reheats perfectly for lunches. The sesame seeds and green onions are best added fresh before serving, but you can store them separately in the fridge for 3 days if needed.
Why You'll Love This Recipe
- One-Pan Wonder: I swear by this for nights when I’m too tired to scrub pots—just toss the cod, garlic, and honey-soy glaze on a sheet pan, and walk away. The sesame oil finishes with a toasty aroma that means dinner’s ready before you even check the timer.
- Sweet-Savory Magic: That honey cutting through the salty soy sauce? It’s the kind of balance that makes you pause mid-bite. The garlic cloves sizzle into crispy perfection, and suddenly, flaky cod feels like a restaurant-worthy dish without the fuss.
- Meal-Prep MVP: Between us, this is my go-to for lunches—I bake a double batch on Sundays, and the leftovers reheat beautifully with a splash of water. Pack it cold for salads or microwave it for a 2-minute protein boost. (Yes, even on a Tuesday night.)
- Budget Fish Feast: Cod’s affordable, and this recipe stretches it further with the umami punch of soy sauce and honey. I’ll be real: it’s the kind of dish that makes grocery night less stressful, especially when every bite tastes like you splurged.
Step-by-step instructions for glossy baked cod
This method delivers restaurant-quality results with a perfect balance of crisp edges and tender centers.
Prepare the Glazing Sauce
In a small bowl, whisk together the 0.25 cup light soy sauce, 2 tablespoons honey, 1 tablespoon sesame oil, 1 tablespoon freshly grated ginger root, and 1 tablespoon freshly squeezed lemon juice. The sauce should be smooth and glossy—this is your flavor foundation. I like to press the ginger through a fine-mesh strainer to remove any fibrous bits, ensuring a silky texture. Set this mixture aside while you prepare the cod.
This sauce creates the signature umami-sweet balance that makes this dish so special. The ginger and lemon juice brighten the soy's richness, while the honey adds subtle sweetness that caramelizes beautifully during baking. Taste the sauce now—it should be tangy, slightly sweet, and packed with aromatic depth.
Dredge and Sear the Cod Fillets
Place the 4 whole cod fillets (skin-side down) on a clean work surface. In a shallow bowl, combine the 2 tablespoons all-purpose flour, 1 teaspoon salt, and 0.5 teaspoon freshly cracked black pepper. Lightly dredge each fillet in the flour mixture, pressing gently to adhere the coating. The flour creates a delicate crust that will crisp beautifully in the oven.
Heat a large oven-safe skillet over medium-high heat and add 1 tablespoon extra-virgin olive oil. Once the oil shimmers, carefully add the cod fillets skin-side down. Sear for 2-3 minutes until the skin becomes golden brown and crispy. You'll see the edges curl slightly—that's your signal to flip. Cook the other side for another 1-2 minutes until just opaque in the center. The cod should release easily from the pan when ready.
Bake to Perfect Doneness
Preheat your oven to 400°F while the cod sears. Transfer the seared fillets to a baking dish, skin-side up. Spoon the prepared sauce evenly over the top of each fillet, making sure to coat all surfaces. The sauce should pool slightly in the bottom of the dish—this ensures maximum flavor transfer during baking.
Bake for 8-10 minutes until the cod reaches an internal temperature of 145°F and the edges are crispy. You'll know it's done when the sauce begins to bubble vigorously and the fish flakes easily with a fork. The skin should be golden brown with a slight sheen from the caramelized sauce. Remove from the oven and let rest for 2 minutes before serving.
Garnish and Serve Immediately
While the cod rests, thinly slice the 2 whole green onions and toast the 1 teaspoon sesame seeds in a dry skillet over low heat for 30 seconds until fragrant. Sprinkle these evenly over each fillet just before serving. The green onions add a fresh contrast to the rich sauce, while the toasted sesame seeds provide a nutty crunch that elevates every bite.
Serve immediately with steamed jasmine rice or a simple cucumber salad. The cod should be moist and flaky in the center with a crisp exterior that holds its shape. Each bite delivers a perfect harmony of sweet, savory, and umami flavors with a satisfying textural contrast. The sauce should coat the fish without overwhelming it, creating a balanced eating experience.
Pro Tips For Making Baked Cod With Soy Sauce
- Pat the Cod Dry: Wet fish sticks to the pan and steams instead of browning. Grab paper towels and press firmly—don’t just wipe—over every fillet. The extra 30 seconds saves you from gray, soggy fish that tastes like it was boiled.
- Sear First, Bake Second: After brushing the cod with honey-soy glaze, hit the oven after a quick sear in a hot pan. Two minutes per side with a little sesame oil builds flavor and keeps the fillets from falling apart when you cut into them.
- Skip the Raw Garlic: I learned this the hard way—raw garlic burns easily and tastes bitter. Mince it very finely (almost paste-like) and sauté in sesame oil until fragrant before mixing into the glaze. The flavor’s smoother, and you won’t end up with a bitter bite.
- Baste Like a Boss: Don’t just dump the glaze and walk away. Every 10 minutes, spoon that sticky honey-soy mix over the cod—especially the edges. It caramelizes faster and gives you that glossy, restaurant-worthy finish without extra effort.
Essential equipment for baked cod with soy sauce
Oven-Safe Skillet
An oven-safe skillet is your secret weapon for achieving that perfect crispy skin without transferring the cod. I recommend a 10-inch cast iron skillet like the Lodge Pre-Seasoned—it retains heat beautifully and develops a natural non-stick surface over time.
The deep sides prevent sauce spills during baking, and its weight ensures even heat distribution. For a lighter option, a stainless steel skillet (like All-Clad Stainless) works too, though it may require a bit more oil to prevent sticking. 🔥
High-Quality Thermometer
Cod cooks quickly, so accuracy is key—never guess the doneness. A meat thermometer with a thin probe (like the Thermoworks ThermoPop) lets you check the internal temperature without piercing the fillets too much.
Aim for 145°F at the thickest part. For extra precision, use a dual-probe thermometer (like Meater) to monitor both the oven and fish simultaneously. This prevents overcooking, which turns cod rubbery. 🌡️
Fine-Mesh Strainer
A fine-mesh strainer (like the OXO Good Grips) is essential for pressing out excess liquid from grated ginger and garlic in the sauce. This ensures your glaze is silky smooth, not watery. I also use mine to drain any excess oil from the seared cod before baking.
For an even finer texture, press the grated ginger through the strainer with the back of a spoon. This small tool makes a big difference in texture and flavor clarity. 🧄
Silicon Baking Mat
Line your baking dish with a silicon baking mat (like Nordic Ware Half-Sheet) to prevent the sauce from sticking and make cleanup effortless. The non-stick surface also helps the cod release cleanly when transferring.
If you don’t have one, a well-seasoned cast iron dish or a lightly oiled baking sheet works in a pinch. Avoid non-stick spray—it can leave a chemical residue that affects flavor. ✨
Tongs for Flipping
Use heat-resistant silicone tongs (like OXO Good Grips) to flip the cod fillets during searing—metal tongs can scratch the pan or burn your hands. The flexible silicone grips gently without tearing the delicate skin.
I also use them to transfer the seared cod to the baking dish without breaking it apart. A pair of fish spatulas (like OXO Fish Turner) is another great option for delicate handling. 🐟
Small Mixing Bowls
Two small mixing bowls (8-10 inches) are perfect for prepping the sauce and dredging the cod separately. I use stainless steel bowls from IKEA’s 365+ line—they’re affordable, durable, and easy to clean.
One bowl for the sauce keeps it contained, while the other holds the flour mixture to avoid cross-contamination. A whisk (like OXO Good Grips) in the sauce bowl ensures everything is evenly combined. 🍶
Nutrition facts
Frequently asked questions
Can I use frozen cod for this recipe?
Yes, but thaw it properly first! Place frozen cod fillets in a sealed bag and submerge in cold water for 15-20 minutes per inch of thickness. Never thaw at room temperature—this promotes bacterial growth. For best results, use skin-on fillets that thaw evenly. Pat them completely dry before dredging to ensure crispy skin.
What's the best way to store leftovers?
Store baked cod in an airtight container in the fridge for up to 2 days. Reheat gently at 350°F for 3-5 minutes to restore crispiness. For longer storage, wrap individual portions in plastic wrap and freeze for up to 1 month. Thaw overnight in the fridge before reheating. The sauce may thicken slightly when reheated—drizzle with a little water to loosen.
Can I make this recipe without soy sauce?
Substitute with 1/4 cup coconut aminos for a gluten-free option or 2 tablespoons fish sauce + 1 tablespoon honey for deeper umami. For a vegetarian version, use 1/4 cup tamari + 1 tablespoon maple syrup. The key is balancing sweetness and saltiness—adjust to taste. The marinade will still caramelize beautifully.
Why did my cod skin stay soft instead of crispy?
This usually happens from one of three issues: not drying the fillets thoroughly before cooking, overcrowding the pan during searing, or baking at too low a temperature. Always pat cod dry with paper towels and use medium-high heat for searing. For extra crispiness, broil for 1-2 minutes at the end of baking. The skin needs direct heat to crisp properly!
What are the best sides to serve with this dish?
This umami-rich cod pairs perfectly with steamed jasmine rice, sesame-ginger greens, or cucumber salad. For a heartier meal, try miso-glazed sweet potatoes or blistered shishito peppers. The lightness of the fish contrasts beautifully with these sides, balancing the rich flavors. Avoid heavy sauces that might overpower the delicate cod.