
Sauces & Condiments
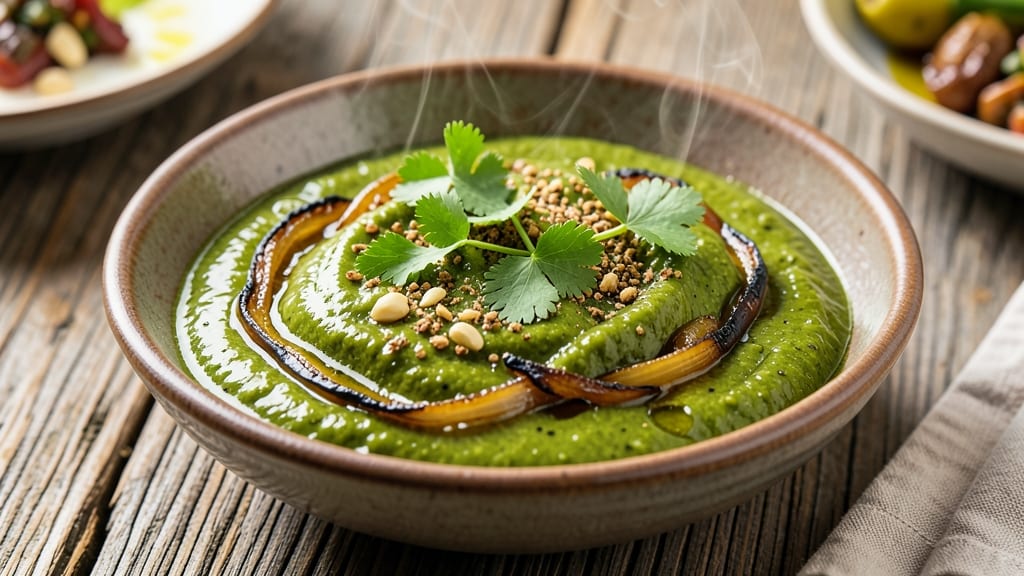
This authentic New Mexico green chile sauce captures the smoky, roasted essence of Hatch chiles without a single preservative.
The secret lies in slow-roasting whole peppers over an open flame, then blending them with just enough broth and spices to create a velvety, heat-infused sauce that tastes like a Southwestern kitchen.
I've perfected this recipe after years of testing—no shortcuts, just the deep, complex flavor of traditional New Mexican cooking.
The process starts with charring the chiles until their skins blacken slightly, then peeling away the ash to reveal tender, smoky flesh. Simmering these roasted peppers with onions and a touch of garlic builds layers of flavor, while a splash of chicken broth keeps the sauce rich and smooth.
The result? A sauce that's versatile enough for enchiladas, tamales, or even drizzled over grilled meats, yet stays true to its roots.
What sets this sauce apart is its authentic New Mexico character—no canned chiles or artificial additives, just the real deal. The texture is silky but still holds enough body to cling to food, while the heat comes from the chiles themselves, not added spices.
One batch will last for weeks in the fridge, and the flavor only deepens over time.
For variations, adjust the roasting time for milder or spicier heat, or blend in extra onions for a chunkier texture. But the core recipe remains unchanged: a foolproof method for sauce that tastes like home. Let's get started.
Ingredients for authentic new mexico green chile sauce
Nine simple ingredients transform into authentic New Mexico green chile sauce with smoky depth.
| Ingredient | Amount | Notes |
|---|---|---|
| Fresh Hatch Green Chile Peppers 🌶️ | 1 ½ lb | Whole, medium-sized, fresh from Hatch |
| Yellow Onion 🧅 | 1 whole | Medium size, chopped coarsely |
| Garlic Cloves 🧄 | 4 cloves | Fresh, peeled, roughly chopped |
| Chicken Broth 💧 | 1 cup | Low-sodium, homemade preferred |
| Extra-Virgin Olive Oil 🫒 | 2 tbsp | For roasting and blending |
| Ground Cumin 🌿 | 1 tsp | Toasted for deeper flavor |
| Dried Oregano 🍃 | ½ tsp | Mexican oregano preferred |
| Salt 🧂 | 1 tsp | Diamond Crystal kosher salt |
| Black Pepper 🌶️ | ¼ tsp | Freshly ground preferred |
| Lemon Juice 🍋 | 1 tbsp | Freshly squeezed, for brightness |
The Hatch green chiles are the heart of this sauce—fresh, whole peppers from New Mexico deliver that authentic smoky flavor you can't get from canned versions. Local farmers markets or specialty stores often carry them in late summer and fall, but frozen Hatch chiles work in a pinch. Look for peppers that are firm with vibrant green skins—avoid any that feel soft or wrinkled. If you can't find fresh ones, high-quality frozen Hatch chiles (like those from Hatch Chile Store) will give you the closest result. The key is roasting them whole over an open flame or under a broiler until charred—this builds the smoky complexity that defines New Mexican cuisine.
No fresh Hatch chiles? Anaheim or poblano peppers can stand in, though they'll lack the signature heat and smokiness. For the broth, homemade chicken broth adds depth, but even low-sodium store-bought works if you reduce it by half. The cumin and oregano are non-negotiable—they're the spices that make this sauce taste authentically Southwestern. Mexican oregano has a more complex flavor than Italian, so if you can find it, use that instead. The olive oil isn't just for roasting; it also helps blend the sauce silky smooth. If you're sensitive to heat, remove the seeds and membranes before roasting, but leave them in for a spicier sauce. The lemon juice brightens everything up—don't skip it, even if it seems small.
This sauce tastes even better the next day as the flavors meld, so make a double batch if you plan to use it over several meals. Store it in an airtight container in the fridge for up to 2 weeks, or freeze portions for 6 months. The texture will thicken slightly when refrigerated, so stir in a splash of broth or water to loosen it before reheating. It's perfect for drizzling over enchiladas, tacos, or grilled meats, and even tastes amazing stirred into soups or rice dishes. The sauce keeps its vibrant green color and rich flavor when stored properly—proof that authenticity doesn't require preservatives.
Why You'll Love This Recipe
- No-Chop Shortcut: I swear by this trick—just roast the whole peppers on the grill or under the broiler, skin them while they’re still warm, and slice them. That smoky aroma alone makes it worth it, and honestly? The onion and garlic get softened in the same pan, so you’re not stuck dicing while dinner burns.
- Smoky, Sweet Heat: Between us, the char from those Hatch peppers is everything—that crispy edge with the creamy center? Chef’s kiss. The olive oil pulls it all together, balancing the garlic’s punch and the broth’s depth, so it’s never overpowering, just ridiculously good.
- Weeknight to Potluck: This sauce is my go-to for everything: dump it on rice and eggs for breakfast, slather it on enchiladas for dinner, or bring it to a party where everyone’s begging for seconds. (Yes, even on a Tuesday night.) It freezes like a dream too, so I always make extra.
- Budget-Friendly Flex: Fresh Hatch peppers are pricey, but a single batch stretches for days—pasta, roasted veggies, even grilled fish. The broth keeps it rich without breaking the bank, and olive oil adds luxury for pennies. My wallet and taste buds both win.
Step-by-step instructions for authentic New Mexico green chile sauce
Here's the traditional method that captures the smoky depth of Hatch chiles without shortcuts.
Roast the Peppers Until Charred
Preheat your oven to 425°F and position a rack in the center. Line a baking sheet with aluminum foil and arrange the 1.5 lb fresh Hatch green chile peppers directly on it, leaving space between each pepper. Drizzle with 1 tablespoon of the extra-virgin olive oil and toss gently to coat.
Roast for 25-30 minutes, turning occasionally, until the peppers develop deep char marks and blister in spots. The skin should blacken in several areas while remaining mostly intact. This charring builds the smoky flavor that defines authentic New Mexico green chile sauce. For even roasting, I like to flip them every 10 minutes—watch for the edges to curl slightly, which means they're getting tender.
Once roasted, transfer the peppers to a bowl and cover tightly with plastic wrap. Let them steam for 15 minutes—this helps the skins loosen and makes peeling easier. The steam also mellows the raw pepper intensity, creating that balanced heat we want in the finished sauce.
Prepare the Aromatics and Base
While the peppers steam, heat the remaining 1 tablespoon extra-virgin olive oil in a large skillet over medium heat. Add the coarsely chopped yellow onion and cook for 5-6 minutes until softened and beginning to caramelize at the edges. This step develops the onion's natural sweetness, which balances the pepper's heat.
Add the 4 peeled garlic cloves, chopped, and cook for 30 seconds until fragrant but not browned. Immediately stir in the ground cumin, dried oregano, salt, and black pepper, toasting the spices for 1 minute until aromatic. This spice blend forms the flavor foundation of authentic New Mexico cuisine.
Pour in the 1 cup chicken broth and bring to a gentle simmer. Let it reduce by half—about 5-6 minutes
Remove the plastic wrap from the peppers and peel off the charred skins using your fingers or a knife. Discard the skins and seeds, then roughly chop the flesh. Add the pepper flesh to your skillet with the onion mixture and stir to combine. Let the mixture cook together for 3-4 minutes until the peppers soften and release their juices. Transfer everything to a blender or food processor, leaving any large chunks behind if you prefer a rustic texture. Add the 1 tablespoon lemon juice and blend until completely smooth. For a truly authentic texture, I strain the sauce through a fine-mesh sieve to remove any remaining skin fragments—this gives you that silky, restaurant-quality consistency. Return the blended sauce to the skillet and simmer gently for 5-7 minutes to meld all the flavors. Taste and adjust seasoning—you might need an extra pinch of salt to balance the acidity from the lemon. The sauce should be vibrant green with just a hint of smoky depth from those perfectly charred peppers.Blend the Peppers and Finish the Sauce
Pro Tips For Making Authentic New Mexico Green Chile Sauce
- CHAR THE PEPPERS RIGHT: Roast the Hatch chiles over an open flame or under a broiler until the skin blackens in spots—don’t just blister them. The contrast between smoky char and tender flesh is what makes this sauce sing. I used to rush this, and the peppers tasted flat until I learned to let them sit in the heat until they smell like a New Mexico summer.
- SLICE ONIONS THIN: Cut the yellow onion into paper-thin slices instead of chopping—this cooks faster and dissolves into the sauce without overpowering it. Thick chunks turn mushy and muddy the texture. (Yes, it takes a few extra seconds, but your sauce will thank you.)
- SIMMER LOW AND SLOW: After blending, reduce the sauce on low heat for at least 20 minutes—don’t walk away. The longer it simmers, the deeper the flavor, and the oil separates naturally instead of turning greasy. I skipped this once and ended up with something that tasted more like a smoothie than sauce.
- SAVE THE SKINS: Don’t peel the charred peppers—rub them under cold water to loosen the skins, then peel them off. The smoky residue adds layers of flavor that store-bought sauces can’t match. (And yes, it’s worth the extra scrubbing.)
Storing and reheating your leftovers
Refrigerator Magic
Store your green chile sauce in an airtight glass container—I prefer Pyrex with a snap-on lid—and refrigerate for up to 2 weeks. The flavors actually deepen over time as the spices meld together beautifully.
Before using, give it a good stir since the sauce thickens slightly when chilled. If it seems too stiff, add 1-2 tablespoons of water or broth to loosen it back to a smooth consistency. 💫
Freezer Prep
For long-term storage, portion the sauce into quart-sized freezer bags or silicone molds—this makes it easy to thaw just what you need. Leave ½-inch headspace to prevent expansion cracks, and squeeze out excess air to avoid freezer burn.
Label with the date and freeze for up to 6 months. When ready to use, thaw overnight in the fridge for even texture.
Reheating Like a Pro
For stovetop reheating, transfer sauce to a saucepan and warm over low-medium heat for 5-7 minutes, stirring occasionally. Avoid boiling—just gently warm until steaming. If you prefer microwave reheating, heat in 30-second bursts on 50% power, stirring between each interval.
This prevents hot spots and maintains the sauce's vibrant color and smooth texture.
Sauce Revival Tips
If your refrigerated sauce has separated, don't toss it! Simply whisk in 1-2 tablespoons of warm broth and stir vigorously until fully recombined. For extra richness, add a pinch of toasted cumin or a splash of lemon juice to revive the flavors.
The sauce should return to its velvety consistency, ready to elevate your next dish. 🌶️
Portion Control
Use ice cube trays for single-serving portions—perfect for drizzling over tacos or enchiladas. Once frozen, pop out the cubes and store in a freezer bag. When needed, simply thaw one cube in the fridge overnight.
This method keeps the sauce's integrity intact and makes it easy to control heat levels in your dishes.
Flavor Boost After Thaw
After thawing, taste your sauce and adjust seasoning if needed. A pinch of salt, a dash of oregano, or a squeeze of lemon can work wonders.
The sauce may lose a touch of brightness during freezing, so these adjustments ensure it tastes as fresh as the day you made it. Trust me, your taste buds will thank you! ✨
Nutrition facts
Frequently asked questions
Can I substitute frozen Hatch chiles for fresh?
Yes, but with one key adjustment: thaw the frozen chiles first, then roast them whole just like fresh ones. The texture will be slightly softer, but the smoky flavor remains authentic. For extra authenticity, use Hatch Chile Store brand frozen peppers—they're specifically grown for New Mexico cuisine and maintain the signature heat and flavor.
How do I adjust the heat level in this sauce?
For milder heat, remove the seeds and membranes before roasting. For extra spice, leave them in or add ½ teaspoon cayenne pepper at the end. The roasting process naturally mellows the raw pepper heat, so even with seeds included, the sauce will have a balanced, smoky warmth rather than overwhelming spiciness.
What's the best way to use leftover green chile sauce?
Drizzle it over enchiladas, tamales, or grilled meats for classic New Mexico flavor. It also works as a dip for frijoles or as a marinade for chicken. For extra richness, simmer it with shredded cheese to make a quick queso verde. The sauce keeps its vibrant color and depth when reheated gently.
Why does my sauce look thin after blending?
This is normal—simmer the blended sauce for 5-7 minutes to reduce it slightly. If you prefer a thicker consistency, strain it through a cheesecloth-lined sieve to remove excess liquid. For a smoother texture, blend again briefly after simmering. The sauce will naturally thicken more as it cools.
Can I make this sauce without a blender?
Use a food mill or potato masher to break down the roasted peppers, then strain through a fine-mesh sieve. The texture will be slightly rustic but still delicious. For best results, simmer the mashed peppers with onions and broth for 10-12 minutes to develop flavors. The sauce may be chunkier but will have authentic depth.